Colours, sizes and add-ons
One product sold in several colours or sizes, and paid extras for food orders.
A variant is the same product in a different colour or size — one shirt, sold in black and white, in S, M and L. You do not make six products. You make one, and list its colours and sizes inside it.
All of this lives on one card in the Add Product form, headed Variants & Options.
Colours#
- Tick This product has color variants. A row of round colour swatches appears under Available Colors.
- Click every colour you stock. A chosen one gets a dark ring and a tick, and the counter on the right says how many are selected.
- Your colour is not there? At the bottom pick the exact shade from the small colour square, type its name in Custom color name (e.g. Maroon) and press + Add color.
A different photo per colour#
As soon as you pick colours, a box called Variant images (optional) appears with one small panel per colour. Press the + in a panel and upload photos of the shirt in THAT colour. When a customer clicks that colour on your website, the gallery switches to those pictures. Add none and the main photos are used for every colour.
Sizes#
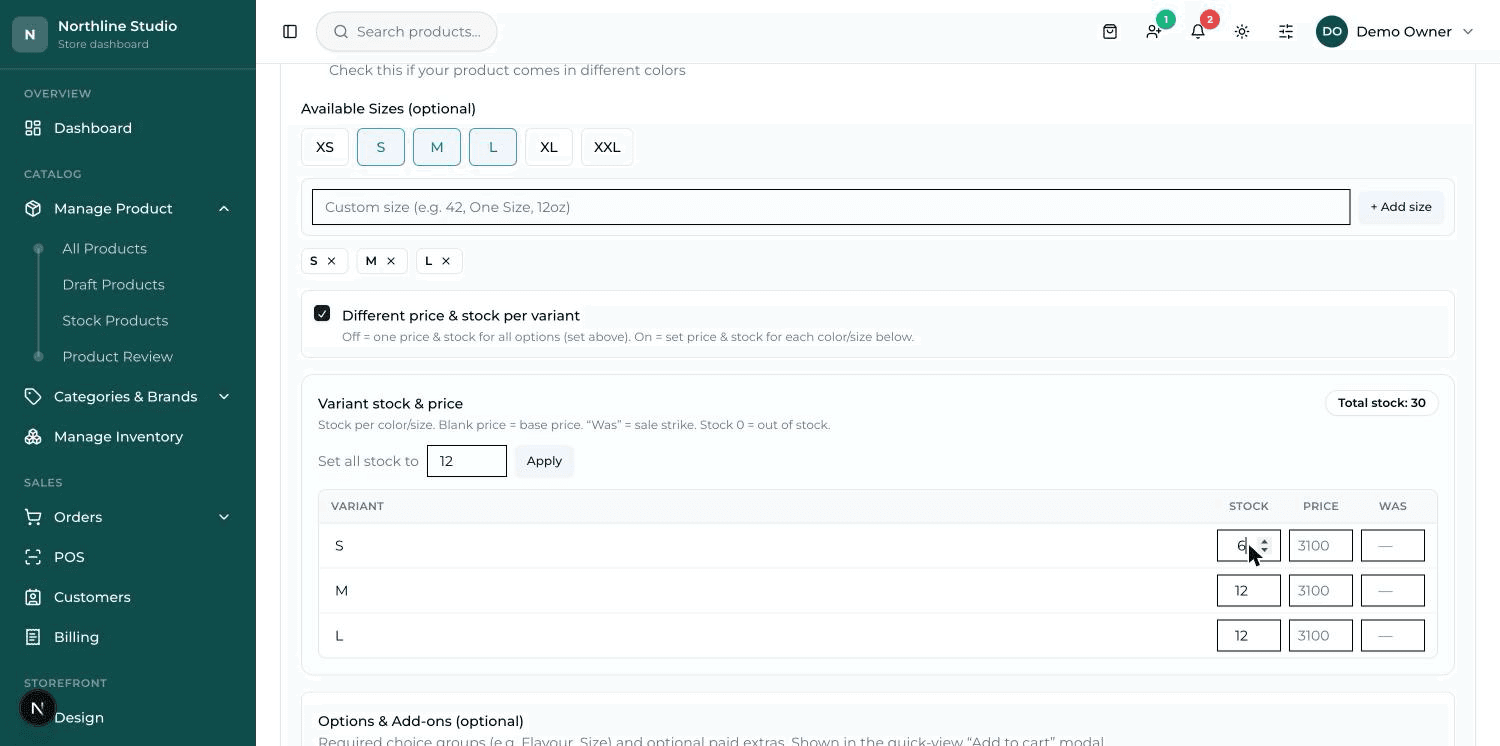
- Under Available Sizes (optional) press the ready-made buttons XS, S, M, L, XL, XXL for the ones you carry.
- For anything else, type it in Custom size (e.g. 42, One Size, 12oz) and press + Add size. Numbers, jar sizes, shoe sizes — anything.
- Every chosen size shows as a small tag below. Press its × to remove it.
A different price or stock for each one#
By default every colour and size shares the one Price and the one Stock you typed higher up the form. That is right for most shops. When it is not — XL costs more, black is nearly finished — tick Different price & stock per variant.
- A grid opens with one row for every colour and size combination.
- Type the stock for each row. Leave a price blank and the base price is used; “Was” is that row's crossed-out old price.
- Same number for everything? Type it in Set all stock to and press Apply.
- The badge at the top right, Total stock, adds them all up. That total becomes the product's stock when you save — you do not type it again.
What the customer sees#
- The colours and sizes appear as buttons on the product page. A combination whose stock is 0 cannot be pressed — the customer sees that L in black is finished without adding it to the cart first.
- If different variants have different prices and the customer has not chosen one yet, the page shows a “from” price — the cheapest one.
- Pick a colour with its own photos and the whole picture gallery changes to those.
Options & Add-ons — for food orders#
Lower on the same card is Options & Add-ons (optional). This is built for food: a choice the customer MUST make, and paid extras they may add.
- Press + Add option group. Type the question in Group name (e.g. Choose Flavour) — Choose Size, Choose Flavour, Choose Drink.
- Press + Add choice for each answer. Type the answer in Choice (e.g. Malai Boti) and, next to it, what it ADDS to the price — 0 for the normal one, 200 for the large.
- Leave the group's Required switch on if the customer cannot order without answering. Turn it off to make it a free choice.
- Underneath, Add-ons (optional extras) works the same way but is always a tick-box list — Chest Piece +50, Extra Cheese +100.