The till screen
Scan, build the bill, take cash or card, give change and print the receipt — with the keyboard shortcuts a cashier needs.
POS is switched on shop by shop. If POS is not in your sidebar, it is not turned on for your shop — nothing is broken, and your provider can switch it on. Everything on these four pages assumes it is on.
The till sells to a person standing in front of you. It uses the same products and the same stock as your website, so one shelf serves both — sell the last shirt at the counter and the website stops offering it.
What is on the screen#
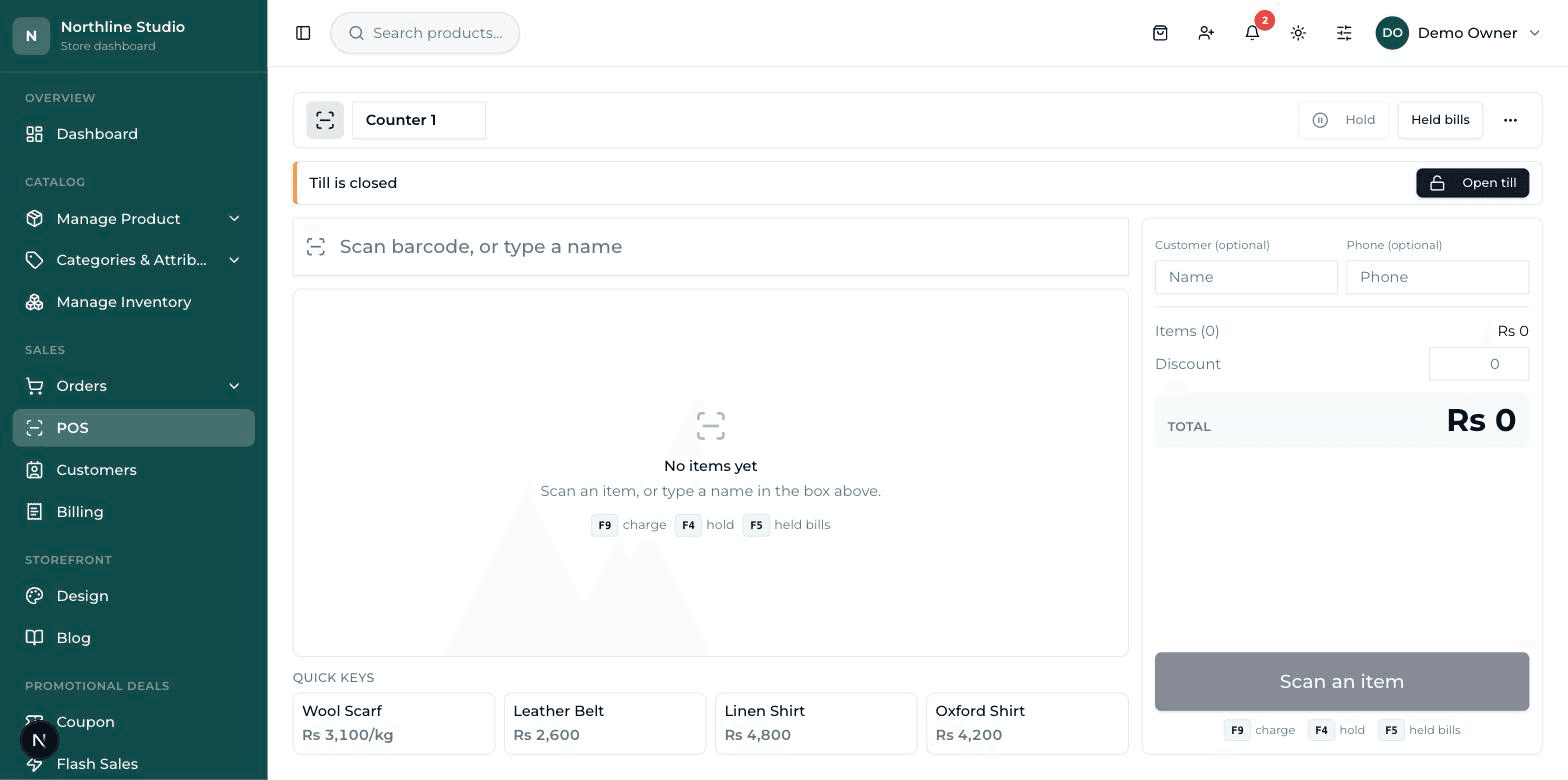
- The strip across the top — the name of this counter (Register), the branch if your shop has more than one, and the Hold and Held bills buttons.
- The thin coloured bar under it — the drawer. Amber says Till is closed, green says Open since… with the float you started with.
- The big box in the middle — the scan box. Everything starts here, and the cursor lives in it.
- The bill underneath it — four columns: Item, Qty, Rate and Amount.
- The panel on the right — the customer's name and phone (both optional), Items, Discount, tax if your shop charges it, the Total, and the Charge button.
- The ⋮ button at the top right — the things you need once an hour, not once a minute: Reprint last bill, Stock in, Report and Move stock.
Before the first sale of the day#
- Check the name in the Register box at the top left. It is remembered on this device, so you only set it once.
- If your shop has more than one branch, pick yours from the box next to it. That is remembered too.
- Press Open till on the amber bar and type the cash already in the drawer. The bar turns green.
Opening and closing the drawer is covered fully on the next page.
Putting things on the bill#
- Point the scanner at the barcode and pull the trigger. The item drops onto the bill and the scan box empties itself, ready for the next one.
- No barcode, or a torn one? Type part of the name and wait — a short list drops down under the box. Click the right one.
- Scan the same item again and its Qty becomes 2 — no second line to hunt for.
Quick keys — the things with no barcode#
A samosa, a slice of cake, a naan: nothing to scan. Those sit as tiles under the bill, headed Quick keys. One tap puts one on the bill.
The owner chooses which products appear there.
- Open Manage Product → All Products and click the product.
- Scroll to the card headed Pricing & Inventory.
- Turn on Show on till (quick key) and save.
Changing or clearing a line#
- More or less of something — press the + and − buttons in the Qty column, or type the number straight into the little box between them.
- Take a line off the bill — press the ✕ at the right end of that row.
- Start the whole bill again — press Clear bill under the Charge button.
Taking the money#
- Press F9, or press the big Charge button on the right. A box opens headed Take payment with the amount beside it.
- Pick cash, card or split across the top.
- For cash — type what the customer handed over in Cash received. Change appears underneath in big numbers. The Exact button fills in the exact amount, and the note buttons beside it fill in a whole note.
- For card — take the money on the card machine, then confirm here.
- For split — type how much came in cash and how much on the card. Green Covers the bill means you can go on; amber Still short … means the two do not add up to the bill yet.
- Press Save & print. A green Sale saved message appears, the receipt prints itself, and the bill clears for the next customer.
Printing and reprinting#
The receipt prints by itself the moment the sale is saved, because the customer is still standing there.
- To print the SAME bill again, press ⋮ at the top right and choose Reprint last bill.
- For any older bill, go to Orders → All Orders, open it, and press Print receipt.
The keys#
Learn these four and your hands never have to leave the counter to find a button.
| Key | What it does |
|---|---|
| F9 | Opens Take payment. Does nothing on an empty bill. |
| F4 | Parks the bill (Hold) and clears the screen. |
| F5 | Opens Parked bills, the list of everything on hold. |
| Escape | Puts the cursor back in the scan box. |
| Enter | In the scan box, looks up whatever is typed there. A scanner presses this for you. |