Handling an order
The orders list, opening an order, what every part of it means, moving it along, adding the courier, and printing the paperwork.
An order has arrived. This page takes you from seeing it in the list to handing the parcel to the courier. Everything happens on two screens: the list, and the order itself.
The orders list#
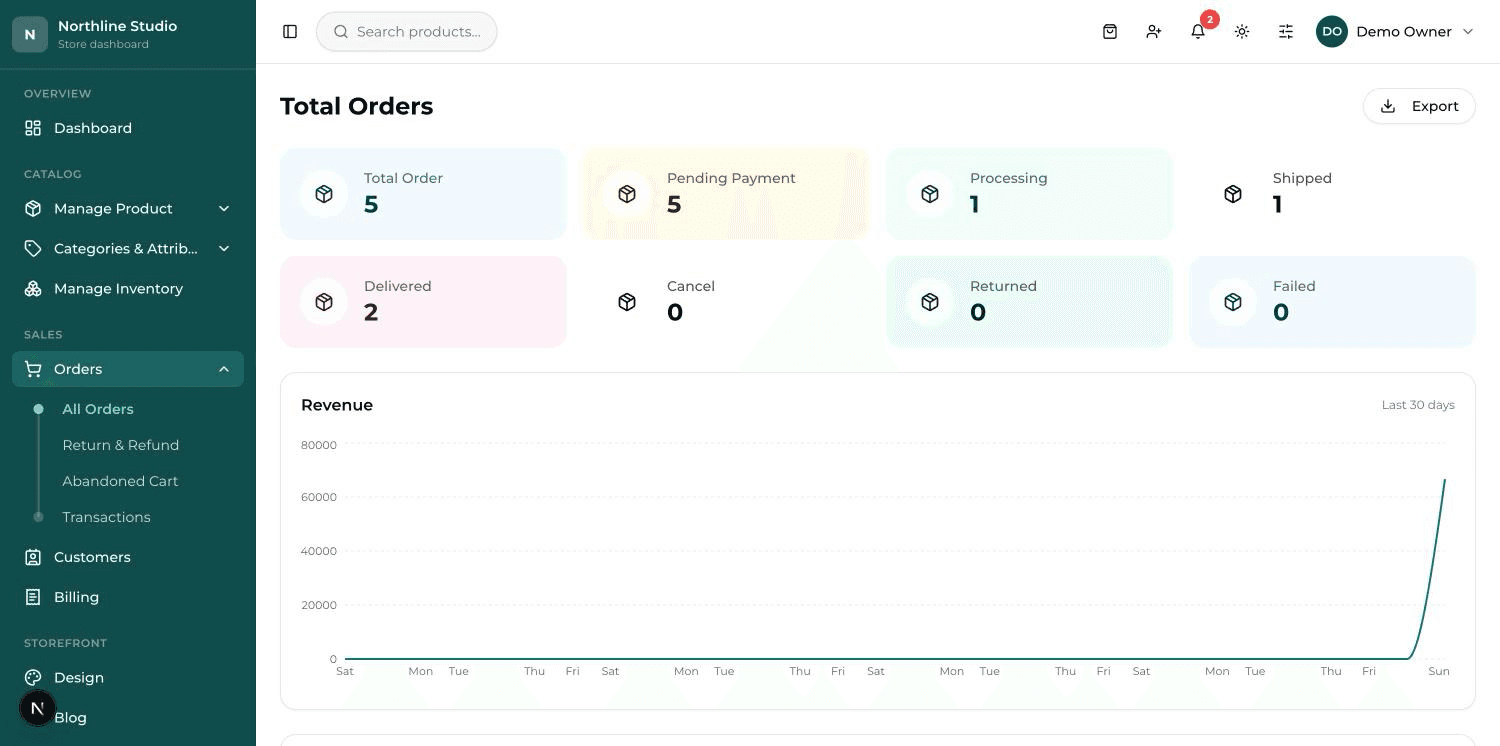
The screen is headed Total Orders. Along the top are counting boxes — Total Order, Pending Payment, Processing, Shipped, Delivered, Cancel, Returned, Failed. Under them is a Revenue chart of the last 30 days. Under that is the list itself, newest order first.
Every row is one order. Reading it from left to right:
- ID — a short number like #a3f9c1. This is what you say on the phone; the full long number is inside the order.
- Customer — who ordered. If they left no name, their email shows instead.
- Items — how many pieces in total, all products added up.
- Amount — what the customer was charged, everything included.
- Payment status — has the money arrived: Paid, pending, or unpaid. Under it, in small letters, how they chose to pay, and a pill saying Online (the website) or Counter (sold at the till).
- Received status — how far the order has got: pending, processing, shipped, delivered, cancelled.
- Date — the day it came in.
Finding one order among many#
Four tools sit above the list. They work together — set two and you get only the rows that match both.
| Tool | What it does |
|---|---|
| Search by email… | Type any part of the customer's email address. This is the fastest way when someone phones. |
| Payment status | Paid, Pending, Failed, Expired — for chasing money that has not arrived. |
| Channel | Online (bought on your website) or Counter (rung up at the till). |
| Received status | pending, processing, shipped, delivered, cancelled — this is your work queue. |
The Export button at the top right downloads whatever the list is currently showing as a spreadsheet file, for your own records.
Opening an order#
- Click anywhere on the order's row (or the small eye on the right).
- A screen headed Order Details opens. This one page has everything about that order.
- To come back to the list, press ← Back at the top right.
What every part of the order means#
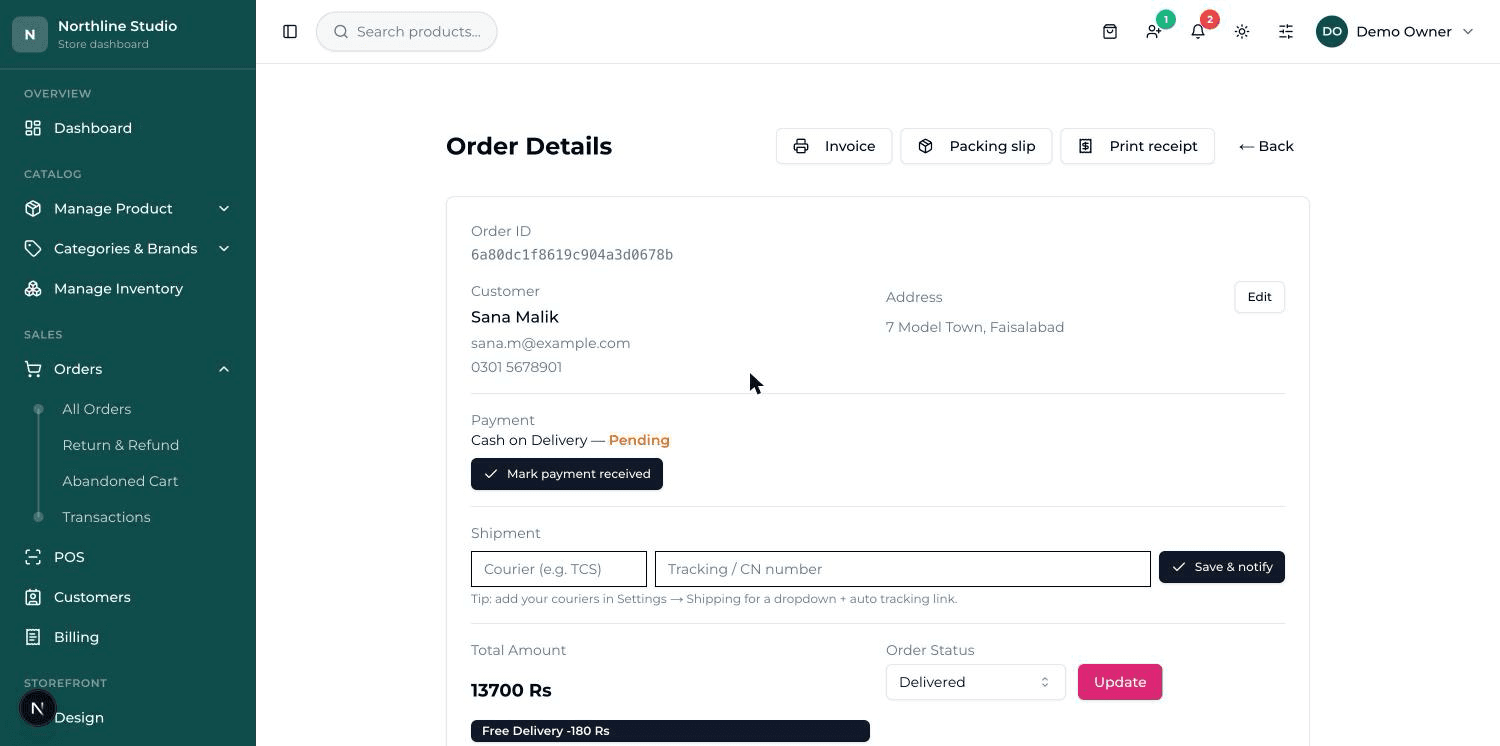
Read it top to bottom. Some blocks only appear when they apply — an order with no gift wrapping simply has no gift wrapping line.
- Order ID — the full long number. Useful when you need to be exact.
- Customer / Address — name, email, phone, and where it goes. Press Edit to correct a wrong address or a mistyped phone number, then Save.
- Order note / Gift message — what the customer typed at checkout. Read this before packing.
- Payment — how they chose to pay, and whether the money has arrived. This is explained fully on the next page.
- Shipment — the courier and tracking number. Explained below.
- Delivery method / Requested delivery — which delivery the customer chose, and any date or time slot they asked for.
- Gift wrapping / Tax / Additional details — extras the customer chose, and anything from your own custom checkout fields.
- Total Amount — the final figure charged.
- Order Status — the dropdown you use to move the order along, with the Update button next to it.
- Items — every product, its picture, how many, and the money for that line. Loose goods sold by weight show the weight instead of a count.
Moving the order along#
The status is the order's stage. You move it yourself, and the customer sees the same stage when they track their order.
- Find the box headed Order Status, on the right, under the total.
- Open the dropdown and pick the new stage.
- Press Update. A green message says the order status was updated, and the page reloads with the new stage.
| Stage | Use it when |
|---|---|
| Pending | It just arrived and nobody has looked at it yet. This is where every order starts. |
| Processing | You have accepted it and you are packing it. |
| Shipped | It has been handed to the courier. Usually you do not pick this by hand — filling in the Shipment block sets it for you. |
| Delivered | It reached the customer. The order is finished. |
| Cancelled | It is not going to happen — out of stock, or the customer changed their mind. |
| Paid / Refund | Money stages. Only a Super Admin sees these, or an Admin the Super Admin has given the refund permission to. |
"Paid" here is not the same as the money arriving
Choosing Paid in this dropdown only moves the order's stage and emails the customer "Payment received". It does NOT change the Payment line higher up the page — that one is changed with the Mark payment received button, explained on the next page.
The courier and tracking number#
When the parcel goes out, record who took it and their tracking number. This is the Shipment block, and it does three jobs in one press.
- Scroll to Shipment on the order.
- Pick the courier. If you have set your couriers up, this is a dropdown saying Select courier…; if not, it is a plain box you type into (for example TCS).
- Type the number the courier gave you in Tracking / CN number.
- Press Save & notify. A green message says the shipment was saved and the customer notified.
- The courier and number are saved on the order, and printed on the invoice.
- The order moves to Shipped by itself — unless it is already delivered, cancelled or refunded, in which case its stage is left alone.
- The customer gets an email with the courier's name and a Track button, so they stop phoning to ask.
The paperwork: invoice, packing slip, receipt#
Three buttons sit at the top of the order. They print three different documents, and the difference matters.
| Button | What it prints | Who it is for |
|---|---|---|
| Invoice | A full bill on normal paper: your shop's letterhead, the customer's details, every item with its price, delivery, discount, tax, and the total — plus a Paid or Unpaid stamp. | The customer, and your own records. |
| Packing slip | The same sheet with NO prices at all — only what to put in the box and how many. | Whoever packs the parcel, and to drop in the box. |
| Print receipt | A narrow till slip for a thermal roll: items, total, what was paid and the change. | Counter sales, handed over with the goods. |
Pressing a button opens your browser's normal print window. From there you can print on paper or save it as a PDF to email.
Deleting an order#
Normally you do not delete an order — a cancelled order should be marked Cancelled, so your figures stay honest. Deleting is for test orders and rubbish.