Selling by weight, and more than one shop
Loose goods priced per kilo, and running several branches with their own stock, transfers and deliveries.
Two things a grocery, a bakery or a sweet shop needs that a clothes shop never does: goods that go on a scale, and more than one shop under one owner.
Setting a product up to sell by weight#
- Open Manage Product → All Products and click the product — flour, sugar, sweets.
- In the card headed Pricing & Inventory, turn on Sell by weight.
- The Price field now reads Rate per kilo (Rs). Type the rate for ONE KILO here.
- The Stock field now reads Stock (grams). Type the stock in grams — a 40 kg sack is 40000. The line under it says back what you typed in kilos, so you can check it.
- The unit locks itself to kg and cannot be changed — weighed goods are always priced per kilo.
Weighing at the till#
A weighed thing has no price until it has been weighed, so it never drops straight onto the bill. Scan it or tap its quick key and the scale box opens first.
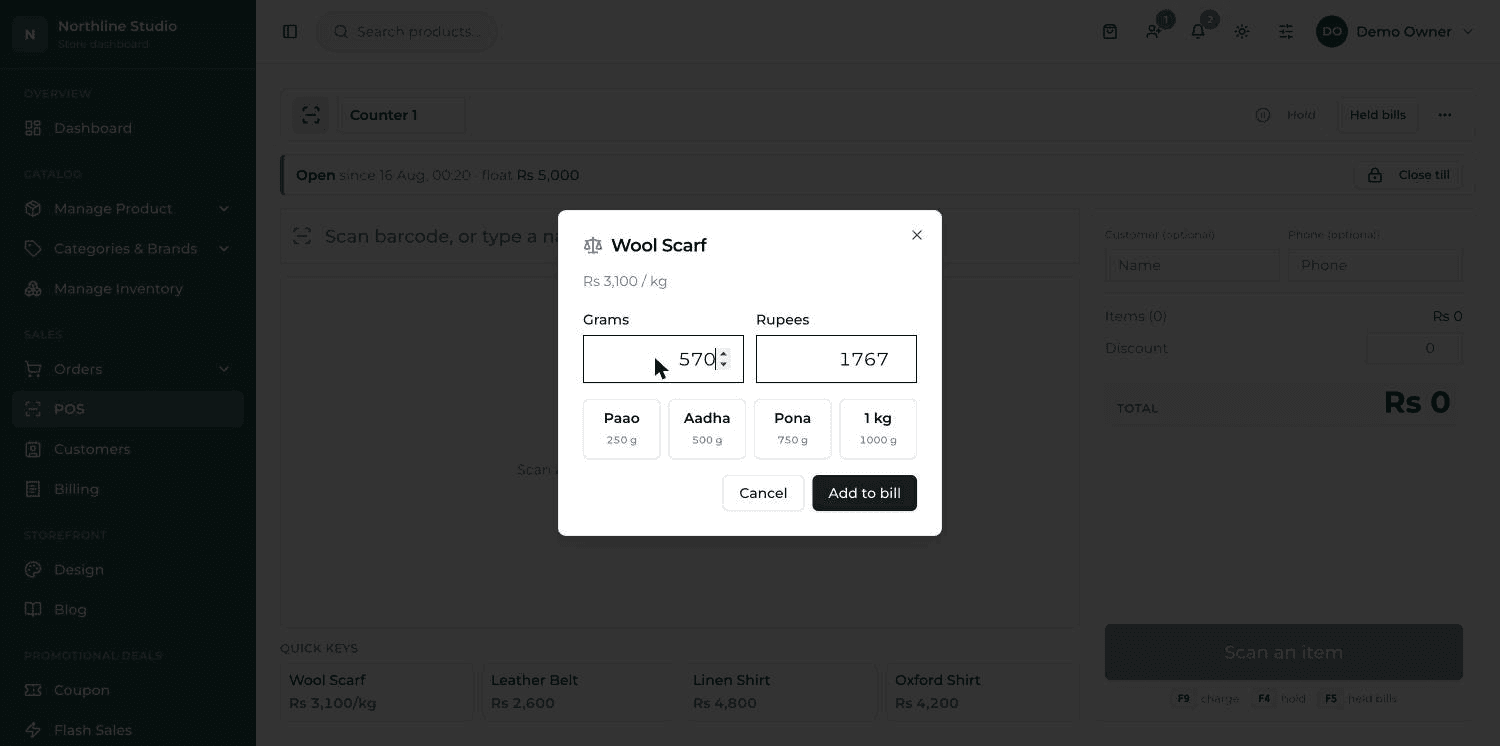
- Read the weight off your scale and type it in Grams. The Rupees box fills itself in.
- Or, when the customer asks for an amount of money instead — "give me Rs 200 of flour" — type 200 in Rupees. The Grams box fills itself in.
- For the four amounts people ask for all day, just tap Paao (250 g), Aadha (500 g), Pona (750 g) or 1 kg.
- Press Add to bill, or just press Enter. The line appears on the bill reading something like 570 g × Rs 350/kg.
The price of a weighing
Rate per kilo × grams ÷ 1000, rounded to the nearest rupee. The system works it out; you only ever put in the grams. What comes off the shelf is the same grams, not one item.
More than one shop#
A branch is a place. Once you have branches, every sale, every shift and every report knows which shop it belongs to, and each shop has its own stock.
- From the POS screen press ⋮ and then Report, and press Branches at the top. Or open the counter report and use the same button.
- Press Add branch, fill in the Name (a Code, Phone and Address are optional) and save.
- Back at the till, a Branch box appears at the top left once you have more than one. Pick yours — it is remembered on that device.
Which shop ships the website's orders#
Exactly one branch carries that job. On the Branches screen it wears a Ships online orders badge. To move it, press Ship online orders from here on another branch and confirm.
Stock, branch by branch#
- A product's Stock is always the TOTAL across every branch. The per-branch figures only say WHERE that total is sitting.
- Selling at a counter takes the goods off that branch's shelf first, and off the total as well.
- A return at the counter puts the goods back onto the branch written on that bill.
Moving stock between branches#
- From the POS screen press ⋮ and choose Move stock. It appears only when you have more than one branch.
- On the right, pick Move from and Move to. A branch cannot send to itself, so the one you pick as the source drops out of the other list.
- Scan each item, or type a name and press Enter. Scanning the same thing twice makes it 2, not a second row.
- The At this branch column shows what the sending branch actually holds. Type how many to send under Move.
- Press Send. A green Stock moved message appears and the form clears.
Booking in a delivery#
Stock in is the opposite of a sale — goods arriving, stock going up. It is kept as its own record so you can answer "how much came in against how much sold", and so a wrong quantity can be found again later instead of just being a number that changed.
- From the POS screen press ⋮ and choose Stock in.
- Scan the delivery item by item. The same item scanned twice becomes 2.
- Check Cost / unit on each row. It is filled in from the product, and you can change it — a supplier raising their price is exactly when the shop's cost should be updated.
- On the right, pick the Branch if you have more than one, and fill in Supplier and Note if you want them.
- Press Save delivery. A green Delivery booked in message appears and the delivery drops into Recent deliveries below.